Last visit was: Mon May 20, 2013 8:59 am
View unanswered posts | View active topics
It is currently Mon May 20, 2013 8:59 am
View unread posts | View new posts | View your posts


 [ 125 posts ]  Go to page 1, 2, 3, 4, 5 ... 13  Next
 Building My Home Made Caravan by JR 
Author Message
User avatar

Joined: Mon Nov 05, 2007 3:09 am
Posts: 2165
Location: Newcastle
Post Building My Home Made Caravan by JR
Hi everyone as you known I have been around on the forum a few years and have loved reading the posts and especially the ones on building caravans. This subject has generated a lot of interest especially to those building or thinking of building a caravan so I thought I would go back in time and start a thread on building my caravan or I should say our caravan.

There are people out there building caravans and I would hope that threads like this may help in some way as other threads on building caravans have done or are doing.
We all do things different and the way I may do something is not necessarily the only way.

Caravan home builders can browse through the different threads and may see something that will help them in building there caravan and then can make a decision on which way they will do it.

As I have finished my van that doesn’t mean the thread will be short, I have not prepared anything so it will be a slow process to produce. I do have a fair number of photos that I will use at the appropriate stage.

The caravan construction started in April 2006 and was completed September 2007 and I am still doing small mods as my needs change. There was a lead up pre-construction stage of about one year while I pondered what layout to use and then draw it and how I would build the van.

When build a van it is not just physical work, 50% of the time was physically working on the van and the other 50% was research and obtaining parts.

P.S. I am a lousy speller so please take that into consideration if you see something a bit odd at times.

History,
We started camping in tents in 1970 with three children then moved to a caravan in 1983. I owned a 1983 five berth 17’-6” Jayco pop top (was called 7 berth) from new ($7200 with full annex) and travelled approximately 150,000Km with this van. As our needs changed so did the Jayco and when we sold it in 2007 it was a two berth with ensuite and also much heavier underneath.

Due to the many mods I had carried out on the Jayco I felt that I had enough understanding of how a caravan is build to build my own.

Our Jayco 1983 to 2007
Attachment:
Our 1983 Jayco.jpg
Our 1983 Jayco.jpg [ 74.08 KiB | Viewed 6556 times ]


Jayco Ensuite
Attachment:
Jayco en-suit.jpg
Jayco en-suit.jpg [ 57.43 KiB | Viewed 6556 times ]


Door to Ensuite
Attachment:
Old Van Ensuite door.jpg
Old Van Ensuite door.jpg [ 120.02 KiB | Viewed 6556 times ]


JR
:razz:


Wed Apr 27, 2011 11:50 am Profile
User avatar

Joined: Mon Nov 05, 2007 3:09 am
Posts: 2165
Location: Newcastle
Post Re: Building My Home Made Caravan by JR
I needed a garage to build the van in as the house garage was not suitable

The land area available would allow me to build an 8 x 7mtr garage with a 3mtr clearance under the two roller doors and a removable centre between the two doors.

As the garage maximum outside length is 8mtrs and the inside length 7.5mtrs the van could not be any longer than 7.5mtrs. To allow a bit of room around the van when in the garage I decided to go for a max length of 7.1mtrs.

The garage walls were assembled on the ground first and were so big I needed nine people to help put them up so I called on all the neighbours which was a good excuse for a party after.

Hiring a scissor lift was worth every penny
Attachment:
Garage 1.jpg
Garage 1.jpg [ 276.97 KiB | Viewed 6523 times ]

Attachment:
Garage 3.jpg
Garage 3.jpg [ 286.23 KiB | Viewed 6523 times ]


The garage needed an “I” Beam to carry a block and tackle for lifing the van chassis
Attachment:
I beam.jpg
I beam.jpg [ 102.94 KiB | Viewed 6523 times ]


JR
:razz:


Thu Apr 28, 2011 4:49 am Profile

Joined: Sun Jun 06, 2010 9:12 am
Posts: 531
Location: Launceston, Tasmania, Australia
Post Re: Building My Home Made Caravan by JR
Hi J.R. :razz:

look like a job well done by you and your neighbours. :razz:

So have a good day. :razz:

Karen,Ron and the Girls. :mrgreen:

Just coasting along. :lol: :lol: :lol:


Thu Apr 28, 2011 5:16 am Profile
User avatar

Joined: Fri Aug 15, 2008 11:11 pm
Posts: 182
Location: Lake Macquarie NSW
Post Re: Building My Home Made Caravan by JR
Hi JR,

Look forward to following your build storey with interest.

Our first pop top van was a 1983 Jayco Songbird. We bought in new from Heatherbray near Raymond Terrace. Nil warranty work and a great van. We had the triple bunk model.

What is now Jayco Newcastle were selling Viscount from a yard at Belmont and owned by Alan McLean.

Cheers,

_________________
Ken and Kristine
Lake Macquarie NSW
Prado 150 GXL D4D Auto
Crusader MK2
ACC N00007

Safe travels and keep smiling


Thu Apr 28, 2011 5:48 am Profile
User avatar

Joined: Mon Nov 05, 2007 3:09 am
Posts: 2165
Location: Newcastle
Post Re: Building My Home Made Caravan by JR
Hi Ken,
Sounds like the same place we bought ours at Heartherbray came with a full annex thrown in. Our Jayco also had three birth at side and rear and a pull out double across the front.

Yes remember Viscount at Belmont and moving to Hexham and changing to Jayco, did not know the name of the owner but if it was Alan, he has just sold the Hexham Jayco business and now under new management.

JR
:razz:


Thu Apr 28, 2011 6:07 am Profile

Joined: Sun Feb 28, 2010 1:53 am
Posts: 410
Location: narre warren south
Post Re: Building My Home Made Caravan by JR
Come on JR, no excuses for you as yours is done, we need more pictures....

Cheers Robert.... :mrgreen:


Fri Apr 29, 2011 2:33 am Profile
User avatar

Joined: Mon Nov 05, 2007 3:09 am
Posts: 2165
Location: Newcastle
Post Re: Building My Home Made Caravan by JR
Hi Robert,
Now it’s your turn to give me a bit of stick.

I know I am crapping on a bit but give me a couple of episodes of war and peace and I will start to get into some photos. There will be no close ups of my welding or my silastic work.

JR
:razz:


Fri Apr 29, 2011 4:31 am Profile
User avatar

Joined: Mon Nov 05, 2007 3:09 am
Posts: 2165
Location: Newcastle
Post Re: Building My Home Made Caravan by JR
Why build your own,
Cost - get what you want – quality and good workmanship is not always available from caravan manufactures - satisfaction I did it my way.

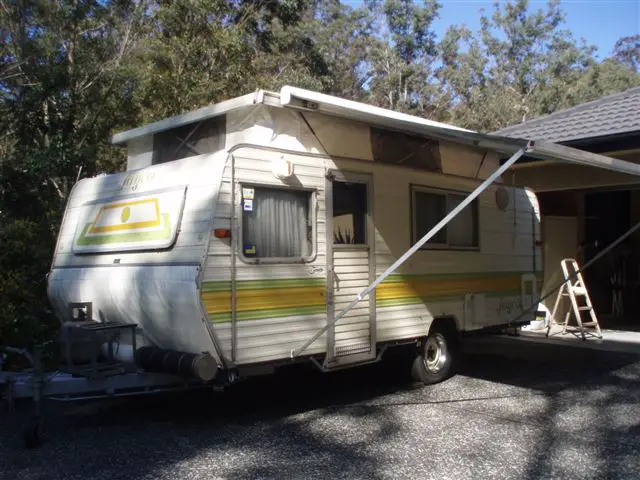
I wanted a reasonable size full van that could handle rough road conditions yet not to heavy, a single axle and no longer than 7.1mtrs total.

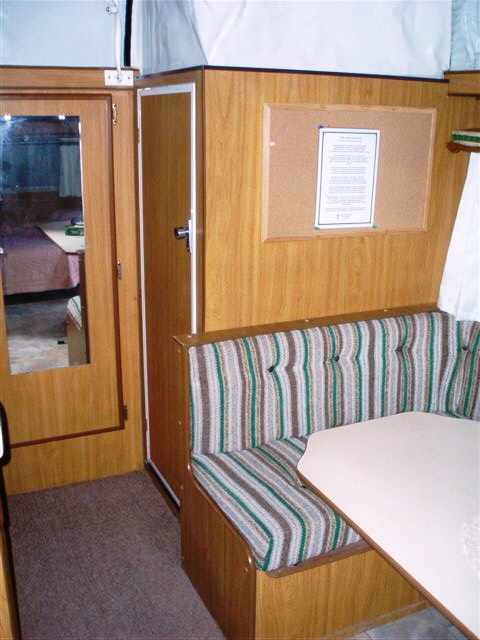
The ensuite needed to have plenty of room in the shower and toilet area and the bed needed to be as comfortable as the bed at home. We are outside people and do most of the cooking on the fire or when on power use the frypan outside so the kitchen size was the area that was a compromise to meet the other requirements. As we have been caravanning a long time we knew exactly what we wanted.

Approach to construction:
I place a lot of importance on making a van that did not look home made.
Stick to convention and use proven products.

Aluminium or wood frame? We have seen all the pros and cons for both I chose wood mainly because I felt I did not have the skilled to build a quality aluminium frame.

Cladding is another item where I stuck to standard aluminium mainly because it is easy to work with and finish off. I do believe some of the newer coverings are better but felt confident working with aluminium sheeting.

Why a single axle,
Our driveway required some manual manoeuvring of the van and also over the years I have managed to get myself into some tight spots that needed the van to be uncoupled and man handled. Hopefully those days are over now but it is very handy to be able to man handle the van.
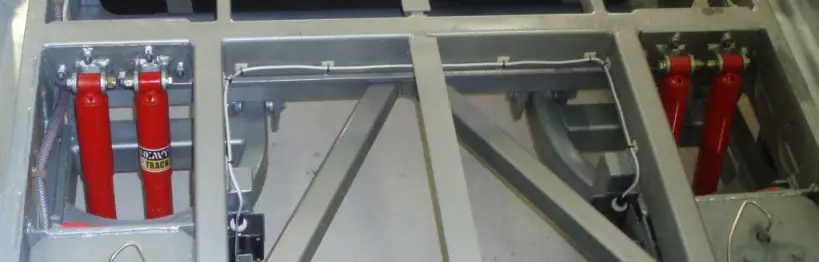
Also due to the limit in size of the van every bit of space in the van is important so with a single axle less area is taken by mud guards. Auxiliaries like HWS, air compressor and receiver, diesel heater, battery, water pumps and accumulator could be housed in areas that would have normally been taken up by larger mud guards.
Maintenance was also a reason I went for only two wheels as it is simpler to repack two bearings instead of four but this was only a miner consideration.

Disadvantages of two wheels:
Weight distribution is much more critical, and so getting the location of the axle in the right place is very important especially on a van as heavy as this one.
Believe it or not cost can be greater as when supporting 2.6tonne on two wheels require non standard axles wheels and big everything. Chassis design needed extra attention to handling all the weight being transferred to the wheels in one small area of the chassis.
Towing a four wheeled caravan is very stable and a two wheel van can also be stable but never as stable as four wheels.

Stage1 Drawing the Van with PC CAD
Drawing the layout by hand to start with was OK but in time I felt I needed a better way to draw so I went out and bought a $100 drawing program called PC CAD which is compatible with Auto CAD the Rolls Royce of drawing packages. PC CAD drawings can be loaded into Auto CAD which can be an advantage and PC CAD also came with a training tutorial which helps gets you started.
Attachment:
Tutorial_PCCAD.jpg
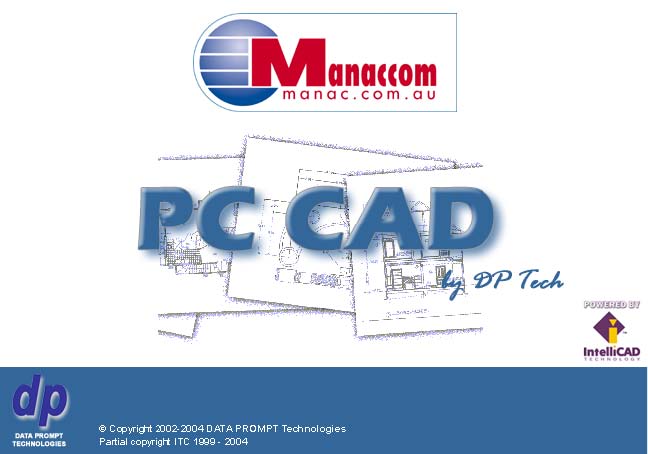
Tutorial_PCCAD.jpg [ 33.28 KiB | Viewed 6447 times ]

CAD will not be for everyone as it takes a lot of time and learning before you can start drawing. Once you have a handle on CAD you can draw the van with so much accuracy that you can make any part you wish and know it will fit when the time comes.
I chose a scale of 0.5mm for my CAD drawing so I could view the entire chassis over 6 or 7mtrs or zoom into a section only 1mm in size if required. When drawing in CAD you use a system of layers and every layer/level can be switched on and off as require, for example, the chassis is one layer the frame is another and the plumbing is another I had about 30 to 40 layers in my drawing.
Floor Plan
The floor plan is the starting point, the best layout for smaller vans with en-suit appeared to be the one with the en-suit in a corner at the rear opposite the door. I wanted a separate shower so the across the back seemed to be the best option but that adds more length to the van. Actually when I decided to run the ensuite across the back I don’t think the caravan manufacturing industry had that layout available.
To keep the length down I eliminated the front boot and used the across underneath the bed boot. The second thing I did to keep the length down was to have the entrance door just in front of the wheel and utilise the entrance as an access area to the bed area as well.
Basically the bed is at the front, ensuite across the back, kitchen in the centre with ‘L’ shaped bench on LHS and stove 150Ltr fridge, microwave and sink on RHS.

The Floor Plan,
Attachment:
Interia Plan.jpg
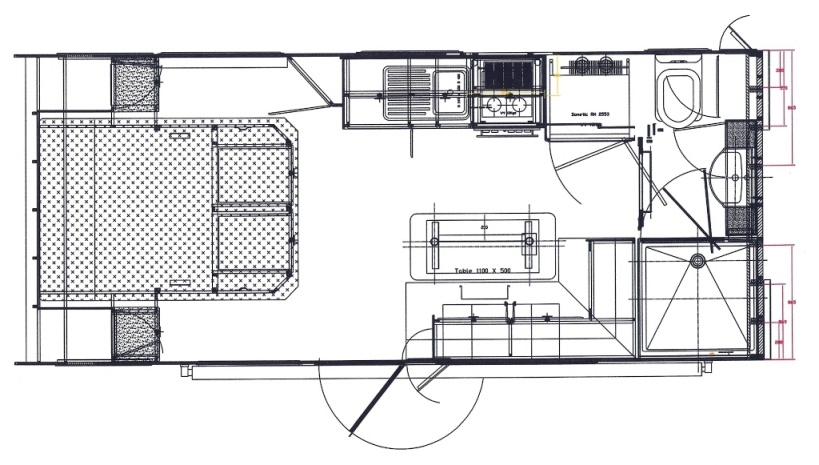
Interia Plan.jpg [ 168.54 KiB | Viewed 6447 times ]


The Van Body Shape,
The rear shape was simple just round off the top and bottom and a vertical rear to gain maximum interior user space and also make it easy to fit cupboards to the wall.
The front was not that simple as I needed to have the front more aerodynamic and yet still not hitting my head every time I sat up in bed.
Using CAD made the job easy to work out an optimum bed height, and gain the maximum under boot space and still maintain good aerodynamics.

RHS View
Attachment:
Side View.jpg
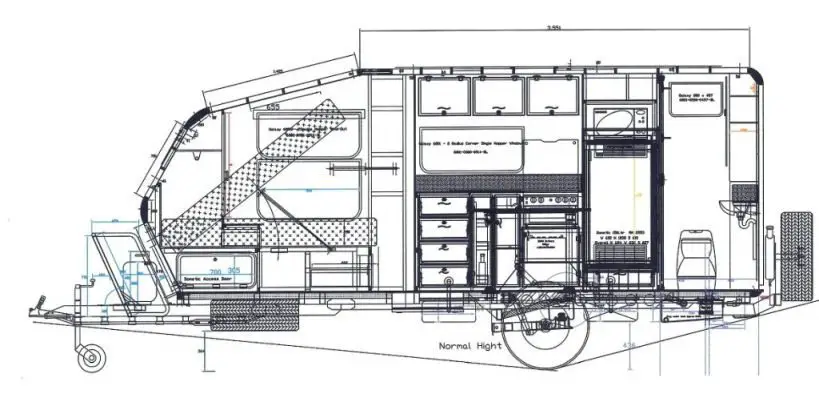
Side View.jpg [ 73.03 KiB | Viewed 6447 times ]


JR
:razz:


Fri Apr 29, 2011 4:45 am Profile
User avatar

Joined: Mon Nov 05, 2007 3:09 am
Posts: 2165
Location: Newcastle
Post Re: Building My Home Made Caravan by JR
Stage 2 the Chassis/Suspension,
After seriously considering the independent rubber suspension (IRS) I moved more towards the independent air bag suspension. Neville Withers in Melbourne made a suspension called Sugar Glider and many heavy duty vans use his system. Most of Neville’s suspensions are coil spring set ups but he was able to build a suspension for me that was rated at three tonnes and would take air bags.

Photo of Sugar Glider suspension with a standard Ford axle beside to demonstrate what a 3.3tonne rated axle looks like compared to a stand axle.
Attachment:
Big axle small axle.jpg
Big axle small axle.jpg [ 100.45 KiB | Viewed 6424 times ]

Attachment:
Suspension.jpg
Suspension.jpg [ 51.56 KiB | Viewed 6424 times ]


JR
:razz:


Fri Apr 29, 2011 7:51 am Profile
User avatar

Joined: Mon Nov 05, 2007 3:09 am
Posts: 2165
Location: Newcastle
Post Re: Building My Home Made Caravan by JR
Stage 2 the Chassis/Suspension Cont.

Using CAD you can easily work out shock absorber travel, max and min height of van, airbag position and the angle to set the air bag to!
Attachment:
Suspension travel.jpg
Suspension travel.jpg [ 46.11 KiB | Viewed 6424 times ]

There are many types of air bags available, the main two brands are Firestone and Goodyear, I chose the Firestone 1T14C-1 with inbuilt in bottoming out rubber. The single air bag has a much softer ride than the multi stage types like, single, double and triple convolusion I used the reversible sleeve type which gives the softest ride but does not have the adjusting height range of the others.
The 1T14C-1 when running at 100psi can lift about 1.5 tonne, my running pressure worked out to be 60psi and as one side of the van is heavier than the other one bag runs at slightly less pressure than the other.

Air bags must be controlled with good shocks and as the shocks will need to work hard with air bags and also due to the location of my shocks (they had less mechanical advantage than normal) they would be working even harder, so I went for adjustable Koni’s two on each wheel.
Attachment:
shocks.jpg
shocks.jpg [ 57.18 KiB | Viewed 6424 times ]

After speaking to people that had air bag suspension it became clear that the bag was rarely an issue the main problems were due to the auxiliary equipment that regulate and supplies the air.
I decided to run the bags at a set height and no auto level control system.

Example of an air bag specifications
Attachment:
Air bag spec.jpg
Air bag spec.jpg [ 101.43 KiB | Viewed 6424 times ]


JR
:razz:


Fri Apr 29, 2011 7:59 am Profile
 [ 125 posts ]  Go to page 1, 2, 3, 4, 5 ... 13  Next

Who is online

Users browsing this forum: Alexa [Bot] and 0 guests


You can post new topics in this forum
You can reply to topics in this forum
You cannot edit your posts in this forum
You cannot delete your posts in this forum
You can post attachments in this forum

Search for:
Jump to: